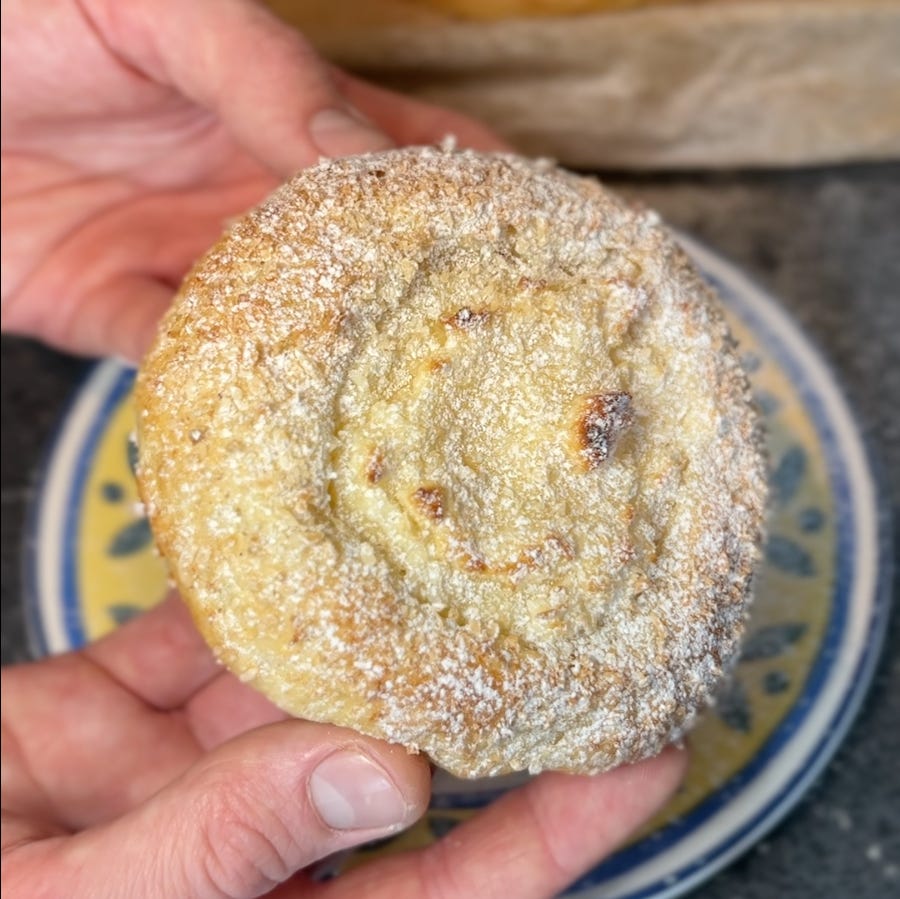
Gluten-Free Coconut Buns
Creamy, custardy bundles of coconut
These buns are stupid good and you can vary the filling by combining the custard with anything your heart desires. Seriously, try adding cheese, as Brazilians do. Cheese in a sweet thing might weird you out but I swear you won’t regret it.
Overview
First we’ll prepare the crème pât at least 4 hours before, up to 3 days before. Then we’ll make the brioche dough, shape the buns, and allow them to proof in a warm oven for an hour or more. While they’re proofing we’ll use some of the crème pât to create the coconut topping. Once the buns are proofed, we’ll add the topping and bake.
Crème Pâtissière (Pastry Cream)
This makes 325g, enough for two batches of these coconut buns. It is possible to halve this recipe to make exactly the amount needed for the buns, but such a small quantity is a bit tricky, so I recommend making this size and using the excess crème however you wish. You won’t regret having extra crème to dip the buns or anything else into. [Tip 1]
Ingredients
230g whole milk
1/2 tsp vanilla
pinch of salt
50g sugar
15g cornstarch
40g egg yolks
45g unsalted butter, cold, cubed
Method
Combine milk and salt in a heavy saucepan and set over medium-low heat until just at a simmer. Meanwhile, combine sugar, salt, cornstarch and yolks in a small bowl until combined and pale. Pour a small amount of the hot milk into the egg mixture while whisking and then slowly add additional milk while whisking to ‘temper’ the eggs. This prevents the eggs from scrambling in the liquid. Add everything back to saucepan.
On medium heat, whisk constantly until thick like pudding and, when pausing, thick bubbles pop under surface (this indicates the cornstarch is cooked). Remove from heat and continue whisking for a minute.
Add vanilla. Whisk in the cold butter, one piece at a time, until totally smooth. Transfer to a container and press plastic directly on surface and refrigerate until cold, at least 4 hours.
Will keep in fridge for 3 days.
Coconut topping
Ingredients
150g crème pât (pastry cream), recipe above
75g desiccated coconut
35g sugar
1/2 tsp vanilla extract
Shredded cheese, like mozzarella/cheddar, to taste (Tip 2)
Method
Combine all ingredients in a bowl and combine vigorously with a spatula, or in a stand mixer with the paddle attachment.
Brioche
Ingredients
10g whole psyllium husk
125g lukewarm water (no more than 40°C)
115g tapioca flour
65g millet flour
30g sorghum flour
25g caster sugar
4g (1¼ tsp) instant yeast
4g (1 tsp) baking powder
4g (~1.5 tsp) xanthan gum
6g salt
20g milk powder (whole, skim, or my preference: coconut) [optional]
60g coconut or dairy milk, lukewarm
1 egg (50g), room temp [for dough]
30g unsalted butter, room temp, cut into 3-4 pieces
3-4 ice cubes (optional)
1 egg [for egg wash]
Method
In a medium bowl, combine psyllium husk and lukewarm water. Whisk dry ingredients (tapioca thru milk powder) in the bowl of a stand mixer or large bowl. Once the psyllium and water has formed a gel (5-10 minutes), add milk and 1 egg to the gel and whisk until combined.
Add psyllium/milk mixture to dry ingredients and beat with paddle attachment or beaters until combined. This is very unlike glutinous dough: we’re not developing gluten here, so the paddle is better at combining the ingredients than the dough hook. While beating, add in butter one piece at a time, waiting to add the next once the previous piece has emulsified.
Scrape down the sides and bottom of the bowl and beat for a minute longer to ensure everything is homogenous.
Cover a sheet tray with parchment. Preheat the oven on a high temp for 5 minutes, then turn it off immediately (this is unnecessary if your kitchen is very hot, like 35-40°C).
Clear some counter space, sanitise it, and sprinkle some millet flour across the surface. Transfer the dough onto the counter and toss it around to coat it in flour. The dough will be very wet and sticky so continue rolling it in flour until you can handle it, but bear in mind that the less flour you use the better (to maximise the hydration). Create an even ball of dough, slice it in half (I use a bench scraper), then cut each of these halves into 3 pieces so that you finally have 6 equal pieces.
Roll each piece into a ball. Place each ball on the sheet tray. Dust your fingers with flour and press each ball into a slightly flattened round. Cover the tray with a damp towel (I soak a tea towel with water then wring it dry) and transfer to the warm oven (ensuring the oven is NOT more than 40°C). Gluten-free dough needs an especially intense proof to get a nice crumb, so a warm, moist environment is very important. You can proof this on the counter but it may take much longer to get a plump rise. If the oven becomes cool at some point during the proof, turn the oven back on for 1-2 minutes and back off to maintain a 40°C environment. While proofing, prepare the coconut filling (recipe below).
After an hour, check the buns. They should be very swollen and over doubled in size. If not, add 15 minutes and check again. Remove the buns and preheat the oven to 185°C (365°F). Once the oven is fully preheated, dampen your fingers and create deep craters in each bun, gently manipulating the edges to maintain a round shape. Divide the coconut filling evenly between all the craters and press the filling down to ensure it doesn’t spill out while baking.
Whisk the other egg vigorously, then apply this egg wash on each bun, avoiding the center with the filling, all the way down the sides to where the bun meets the parchment. This will give the buns a lovely deep colour and smoother surface.
Sprinkle dessicated coconut all across the tops of the buns so that it sticks to the egg wash. Add the buns to the oven and throw in a few ice cubes onto the bottom of the oven (optional). This maximises oven spring by keeping the surface of the buns pliable as they expand and creates a thinner, softer crust. Bake the buns for 12 minutes, then check. They should be deeply golden and the coconut filling should be slightly browned. If you’re uncertain, use a food thermometer to check if the interior of the bun (not the coconut filling part) is at least 87°C and not much more.
Remove the buns and allow them to cool to room temp. Dust with icing sugar if desired.
Storage: Buns are best day-of, but refrigerate for up to 2 days if desired. Reheat briefly to soften before eating.
Serving suggestion: With a mug of coffee, of course.
Tip 1: If using elsewhere (like for dipping), whip the crème until loose and smooth.
Tip 2: This might sound crazy to you, but coconut/cheese is a popular Brazilian pairing that goes surprisingly well with sweet baked goods. And this way, it feels more like a rounded breakfast!
Notes for Nerds:
Use this as a template for a wide variety of fillings. You could use ground almonds (toasted would be lovely) and amaretto instead of coconut. Or combine the crème with melted and cooled chocolate. Or fill the buns with sweetened cream cheese and fresh fruit or jam. I imagine frangipane would be nice as well. The world is your brioche.
If this is your first gluten-free bread, expect the dough to be totally unlike anything you’ve made before. It will resemble goo until you bring it together manually. It will be spongy and not at all extensible. After being baked, it will surprise you how similar the crumb and chew is to glutinous bread.


